10 Sassy and Fun STEM Valentine's Activities and Experiments
We have gathered the top 10 STEM Valentine's activities that you can do with your little scientists. These experiments can be done with materials found around your home.

1. Dissolving Candy Hearts
What is solubility?
Solubility is how well a substance (the candy) can dissolve in a solvent (the liquid). Dissolving is when the solute (candy) breaks into smaller molecules which is caused by coming into contact with the solvent (liquid).
What you will need:
-
Candy Hearts
-
Test Tubes (bowls will work)
-
Water, Soda, Vinegar or any liquid of choice
Procedure:
- Add an equal amount of the chosen liquids to each test tube or bowl.
- Make sure to discuss predictions about what is going to happen in each liquid.
- Add one candy to each liquid.
- Watch and record what happens to the candy as is dissolves in each liquid.
- Ask questions: Which liquid dissolved the candy the fastest or the slowest?Why do you think the candy dissolves faster in some liquids but not in others? Record the time it takes for each candy to dissolve in the different liquids.
CLICK HERE FOR FREE PRINTABLE PDF

2. Valentine's Lava Lamp
Everyone loves lava lamps or anything that fizzes and bubbles. This lava lamp is a blast for kids to add their own ingredients and watch their experiments come alive!
How it works?
Oil and water don't mix, so when the antacid tablets come in contact with the water they release carbon dioxide bubbles which rise up through the oil and create the lava lamp effect.
What you will need:
- clear glass jar or beaker
- pink or red food colouring
- glitter
- antacid tablet
- water
- vegetable or baby oil
Procedure:
Step 1: Fill your jar or beacon a little over half with your oil. Then mix food colouring, water and glitter together in separate bowl and pour the mixture into your jar to fill the remainder of space.
Step 2: Make sure the jar is at the child’s eye-level. Break up 1 Alka seltzer tablet into 3-5 pieces and slowly let your child drop the pieces into the jar and watch the lava lamp come alive with awesome bubbles!

3. Cupid's Magic Milk Experiment
This experiment is a fun way to introduce chemistry to your kids! They get to watch and learn how different properties bond and react to another. Explore how these different materials react under different conditions.
How it works:
The chemical reaction between the milk and the dish soap are responsible for cupid's magic. Milk consists of different molecules such as fat, protein, vitamins and minerals. The dish soap breaks apart these molecules and bonds with the fat molecules. The movement is the soap trying to find the fat molecules. When there is no more movement all the fat molecules were found.
What you will need:
- Milk (higher fat the better)
- Red and pink food colouring
- Heart shaped cookie cutter
- Dish soap
- Cotton swabs
- Big and small bowl
Procedure:
- Pour your milk into the your big bowl, and put your heart shaped cookie cutter in the center.
- Then add drops of your food colour all around the outside of the heart
- In a small bowl you have your dish soap, and with your cotton swab you dip it into the dish soap then dip it onto the food colouring in the milk.
- Watch as the colours burst and mix together.
- Do it again in your heart shape and watch the colours jump and spin around.

4. Engineer A Candy Structure
What kind of structures can you build with toothpicks and Valentines candy? A tower, bridge or geometric shapes? This is a simple but awesome building activity for kids and its mess free. This activity is adaptable for any age!
Expand learning opportunities:
For the littlest scientists you can modify this activity and build 2D structures, shapes and letters. Expand learning opportunities by discussing
- Are all the edges of the shapes the same length?
- Discuss how many edges/vertices/faces there are in each structure.
- How many subshapes can they find within each shape?
- Test your structures to see how much weight they can hold. Which shape is the strongest?
What you will need:
- Soft gumdrops or jelly beans
- Toothpicks
Procedure:
- Discuss what shape or structure you are going to build
- Gather your materials
- Start building! If it falls down or does not work, analyze what went wrong and try to fix it.

5. Happy ValenSLIMES Day
Complete this experiment at home with your little scientists or package it up and gift it you other children in your child's class. One batch of slime makes about 3-4 cups.
How it works?
Slime activators (borax) change the position of the molecules in the glue. A chemical reaction occurs between the glue and the borate ions (molecules in the borax), and a new substance is produced, SLIME!
What You’ll Need:
- Clear Elmer’s Glue
- Heart Confetti
- Glitter
- Water
- 2 Bowls
- Spoon
- Borax
Procedure:
- First fill two bowls with ½ cup of water each
- Add ½ cup of clear glue to the one bowl
- Mix well then stir in the glitter
- Add ½ a teaspoon of borax to the other bowl and mix together.
- After that slowly stir the borax mixture into the bowl with glitter glue and it will start to get the slime texture.

6. Valentine's Volcanic Eruption
This is a great alternative to giving out candy. You can pre-measure out the ingredients and package with a card. This experiment never gets old, adding different themes and colours makes every explosion exciting to watch.
How it works?
A chemical reaction between vinegar and baking soda creates a gas called carbon dioxide. The gas gets very excited and tries to spread out. There is not enough room in the bottle for the gas to spread out so it leaves through the opening very quickly, causing an eruption!
What You’ll Need:
- Hydrogen Peroxide
- Warm Water
- Yeast Packets
- Food Colouring
- Dish Soap
- Flask or plastic bottle containers for mixing
Procedure:
- First pour half a cup of peroxide into your container
- Squirt dish soap into your flask or bottle and swish it around
- Next add your red or pink food colouring to the flask.
- Now you want to make your yeast mixture by mixing 1 tablespoon of yeast with 3 tablespoons of very warm water.
- Stir to dissolve yeast as best as possible.
- Pour yeast mixture into the container and watch your Volcano erupt!

7. You Make My Heart Fizzle
This experiment is a small scale explosion. If you are worried about your littlest scientists making a big mess, this experiment is a good place to start the exploration of chemical reactions. While you are conducting your experiment you can talk about colour mixing and reactions.
How it works?
When vinegar and baking soda are first mixed together, hydrogen ions in the vinegar react with the sodium and bicarbonate ions in the baking soda. The interaction of these two ingredients is what causes the bubbles you see to form.
What you need:
- Paper
- Glue
- Baking soda
- Vinegar
- Cups
- Food colouring
- Pipettes (optional, but a great fine motor exercise!)
Procedure:
- Pour the vinegar into cups and add food colouring
- Squeeze glue onto the paper in heart shapes
- Pour baking soda on the hearts, some baking soda will be left on your paper, make sure to shake off the extra baking soda.
- Use the pipettes to squirt coloured vinegar onto your baking soda heart.
- Enjoy the fizzy explosions

8. Viscosity Hearts
This experiment takes liquids that you already have around the house and allows your little scientists to compare them. This experiment is easy to prepare as not many materials are required and the liquids that you use can be whatever you have available.
What is viscosity?
What you need:
- Small clear plastic cups or containers
- Small plastic hearts
- 3 or more various liquids (any of the following: water, dish soap, hair gel, oil, liquid glue, corn syrup etc.)
- Paper and a pencil
Procedure:
- Gather the liquids that you want to use
- Pour the liquids into separate clear containers, this is a great time to really check out the viscosity of the liquid. Less viscous liquids will pour faster than more viscous liquids. Write down what you observe.
- Label each cup from low viscosity to high viscosity.
- Drop in your plastic hearts
- Record what happens to the heart in each liquid.
- Do the hearts sink or float?
- Which liquid suspends the hearts the best?
- Do those liquids have high or low viscosity?

9. Love Potion
Our little scientists love mixing different potions. What better potion than one for LOVE? We believe the world always needs more love! This experiment is great because it requires a little patience, a steady hand and carefully mixing different liquids to create a complex potion. After all, love is complicated sometimes!
How it works?
It is possible to stack different layers of liquids on top of one another. The key is that all the different layers must have different densities. You can stack them by picking several liquids with a range of densities. Experiment by changing the density of a liquid by adding salt or sugar to it.
What you need:
- Clear bottle or jar (tall and narrow works best)
- Corn syrup
- Milk (whole milk works best because it is denser)
- Dish soap
- Water
- Baby oil
- Rubbing alcohol
- Food colouring
- Measuring cup
- Squirt bottle, syringe or baster
Procedure:
- Pour corn syrup into a liquid measuring cup and add food colouring (amount can vary depending on the size of the container you are using)
- Pour whole milk into a squirt bottle and add a few drops of a different food colorant. Slowly add to the bottle a little bit at a time so the layers do not mix.
- Tilt the bottle slightly and squeeze in about an inch of dish soap.
- Add a few drops of food colouring to some water, pour the water slowly down the side of the bottle.
- Add the baby oil in, the baby oil is the easiest to pour in as it won’t mix with water-based liquids. You still want to be careful when pouring because any movement could cause the other layers to mix.
- For the final layer add about ¼ cup of rubbing alcohol into the squirt bottle and add a few drops of food colouring. Carefully squeeze a few drops at a time.
- Finally, you can add some glitter (optional) to give the potion some sparkle.

Check out Playdough to playto for other ideas!
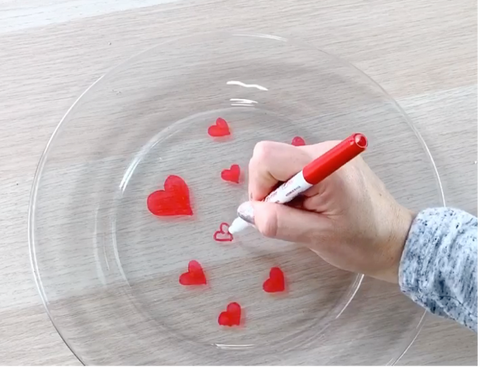
10. You Make My Heart Float
This experiment is so simple and so cool. We didn't believe it actually worked! Draw different sized hearts, shapes or other pictures on a plate and carefully add water. Watch as the marker lifts off the page and your drawings start to float around. We noticed that bigger drawings worked the best!
How it works?
The dry erase marker has a special chemical in it, which causes the ink to not actually stick to the surface of the plate. The ink is not attached to the plate which allows the water to slide underneath it and lift it off the plate, because ink is lighter than water, it will float.
What you need:
- Dry erase marker
- A plate (either glass or ceramic)
- A straw (optional)
- Water
Procedure:
- Place the plate on the table.
- Draw hearts or any picture on your plate with the dry erase marker. (bigger hearts seem to work better, small ones can dissolve in the water)
- Wait 1 minute for the ink to dry.
- Pour water onto the sides of the plate, not directly on your drawing. Or use a straw to add liquid slowly.
- Watch the magic happen! The hearts will lift off the plate and start to float around.
- Use your straw to move your picture around in the water!